What is the difference between an Employee and an Account in the IDP module?
The admin panel has two sections for working with accounts: List of accounts and List of employees.
The system uses two related but distinct objects— account and employee . They are located in separate sections for a reason: each serves a specific purpose.
An account is a login account.
It is responsible for authorization and access rights. The account configures the user's role and determines which departments, employees, and their IDPs the user will have access to. In other words, the account determines what the user can see and what actions they can perform.
An employee is a person's card in the company's organizational structure.
It stores basic information: full name, email, phone number, job title, department, and staffing position. You can also assign managers and specify whether the employee can mentor other users. The Employee Card describes the individual's position within the company and their organizational connections.
Separating these objects allows for flexible management of the system.
Not every employee may require login access. For example, a person may participate in assessment sessions as a respondent but not need to create an IDP or log in to the system—in this case, only an employee is created, without an account. Alternatively, when an account is created (for example, when importing data), an employee may be created automatically.
Thus, an employee is a user in the organization’s structure, and an account is his access to the system .
They are most often created together and linked, but can exist separately if necessary. This separation makes the system more flexible and easier to administer.
Possible roles of accounts in the IDP
The system uses a role-based access model. This means that user rights are determined by the role assigned to them. A role defines a set of permissions that determine which sections of the system the user has access to, what actions they can perform, and which employees they can work with.
By default, the system provides four basic roles: Administrator , HR , Manager , and Employee . These roles cover the main scenarios for working with goals, IDPs, and performance review processes.
If necessary, you can create an additional role with a specific set of permissions. To do this, the administrator must contact the Support Service.
Access by role is formed at two levels:
- Functional permissions – determine what actions are available to the user (creating goals, editing IDP, generating reports, etc.);
- Employee visibility scope - determines which employees the user can work with.
Even if a functional permission is enabled, a user will not be able to perform an action on an employee who is not in their scope.
If permission is disabled, the corresponding interface elements (buttons, links, menu sections) are completely hidden. Direct link access is also blocked in this case. This means the user only sees the functionality available to their role.
By default, the role model in the system looks like this:
- Administrator:
Has extended rights in the system. Can access the admin panel, manage employees, run reports, and work with processes within the configured permissions. Administrators initiate changes to role permissions through Support. - HR
typically manages development plans and employee evaluation processes. Depending on the settings, it can create and edit IRPs, run summary reviews, and generate reports. Visibility can be either full or limited. - Manager:
Typically works with their team. Can manage employee goals, participate in approvals and assessments, leave comments, and track task completion—provided the relevant permissions are enabled. Managers can also launch competency assessments from the user interface if enabled in the company, and generate assessment reports (if permitted by the assessment results visibility settings). - The employee
works primarily with their own development plan: views and edits goals, participates in the assessment process, and leaves comments—if allowed by the role settings. They can see the skills and competencies required of them and evaluate their suitability for a potential vacancy. They can view the results of their assessment sessions (if results visibility settings allow) and generate reports on their IDP.
The set of available actions for each role is determined by the settings configured in the company during the launch phase. Even for the same role, permissions may vary across different companies.
If you would like to clarify or change the list of permissions and access rights for roles, please contact Support.
Possible permissions for roles in the IDP module
Properly setting up roles ensures transparent distribution of responsibilities, protects employee data, and allows for development and evaluation processes to be aligned with the company's structure.
The View Employees feature allows you to customize the display of employees in the user interface in the My Team section:
- All – the user sees all employees in the system;
- Only my own – the user sees only his subordinates and those users whom the administrator has allowed him to see;
- Nobody – the user does not see the My Team section in the user interface.
Function | Possibilities | Note |
Creating a goal | Determines whether goals can be added to your own and your employee development plans. | If disabled, the New Goal and Add Goal buttons are not displayed in the development plan, employee profile, and bulk actions window. |
Editing a goal | Allows you to change goals in your own and employee development plans: change the status of goals and materials, and indicate the percentage of completion. | If disabled, the Edit button is not displayed when viewing a goal in the development plan and employee profile. |
Editing the list of materials related to the goal | Allows you to edit the list of materials when creating and editing a target. If not set, the user is prohibited from changing or deleting materials for any system purposes. | Typically, this limitation is used in conjunction with the automation Automatically add all recommended content when creating a goal . In this case, when creating a goal:
|
Removing a target | Allows you to delete goals in your own and employee development plans. | If disabled, the Delete button is not displayed when viewing the goal in the development plan and employee profile. |
Creation of an Individual Programme of Action | Allows you to open IDPs for yourself and employees to whom the user has access. | If disabled, the Open IDP button is not displayed in the employee's development plan and profile, and the New IDP button is not displayed in the mass actions window. |
Removal of IDP | Allows you to delete the IDP for the user himself and in the development plans of available employees. | If disabled, the Delete IDP button does not appear on the My Team and Employee Profile pages . |
Curator Management | Determines the ability to assign and remove target curators. | If disabled, then the administrator with access to the employees' IDP is nominally the curator. A role with disabled permission to manage curators does not have the ability to manage the list of curators, namely:
|
Editing the route during the approval process | Allows you to change the route during approval. | If disabled, the Edit button is not displayed in the IDP approval window. |
Access to the admin panel | Allows you to regulate access to the administrative panel of the IDP module | If disabled, access to the admin panel page is denied, and the button for switching from the user interface to the admin panel is not displayed. Important: If a user with an administrator role in the admin panel changes their role to another one (without access to the admin panel), access to the admin panel will be automatically lost. After this, the user will not be able to open the Admin Panel again until another administrator returns the admin role to their account. |
Generating reports | Allows you to regulate the possibility of generating reports on the IDP. | If disabled, the Generate Report button is not displayed for your IDP and the IDPs of your employees in the My Team section . |
Leaving comments | Allows you to leave comments on the target. | If disabled, the Write a comment field is not displayed in the target view window. |
Initiation of the process of summing up the results of the IDP | Regulates the process of initiating the summing up of the results of the IDP. | If disabled, the Summarize buttons in the My Team section and the Add Summary buttons in the Summary tab in the Goal Plan section are not available . |
Deleting the results of the summary | Allows you to delete data related to the process of summarizing the results of the IDP or the results of the goal in the IDP. | If disabled, it is not possible to delete the totals for the goal and the IDP as a whole. |
Creating a competency assessment session | Allows you to create and launch a competency assessment session in the user interface using a template created by the administrator. Enabled by default for the Manager role if competency assessment is enabled in the company. | If disabled, the Run Assessment button is not displayed in the user interface under Assessment and My Team . |
Editing the results of the summaries | Determines the ability to change the results for the goal and IDP, remove and add additional evaluators. | Can be configured in three options:
|
The set of available actions for each role is determined by the settings configured in the company during the launch phase. Even for the same role, permissions may vary across different companies.
If you would like to clarify or change the list of permissions and access rights for roles, please contact Support.
Filters and sorting in the Account List section
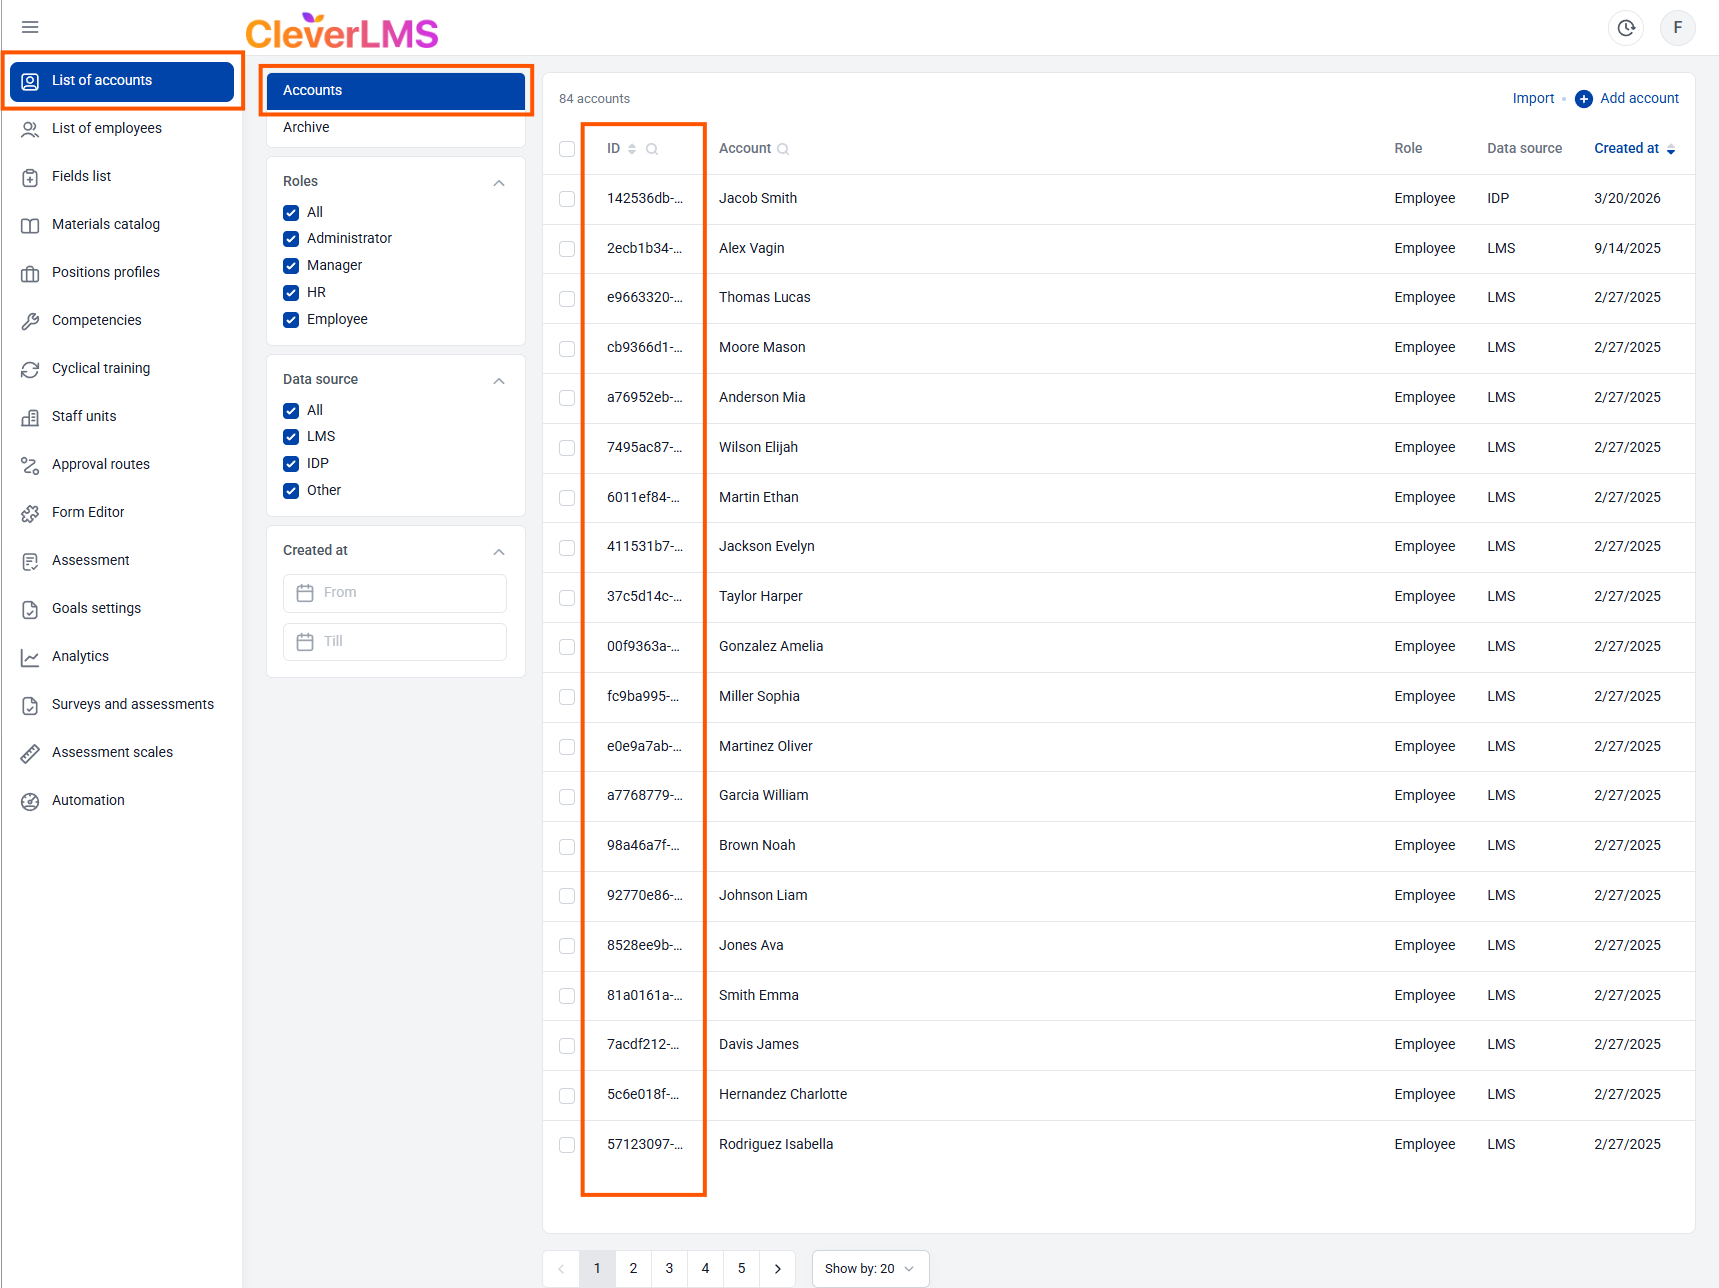
Users in the Account List section can be sorted by the date they were added in the Added column . Searching by internal ID and user name is also supported.
You can customize the display of accounts using filters located in the section's side menu.
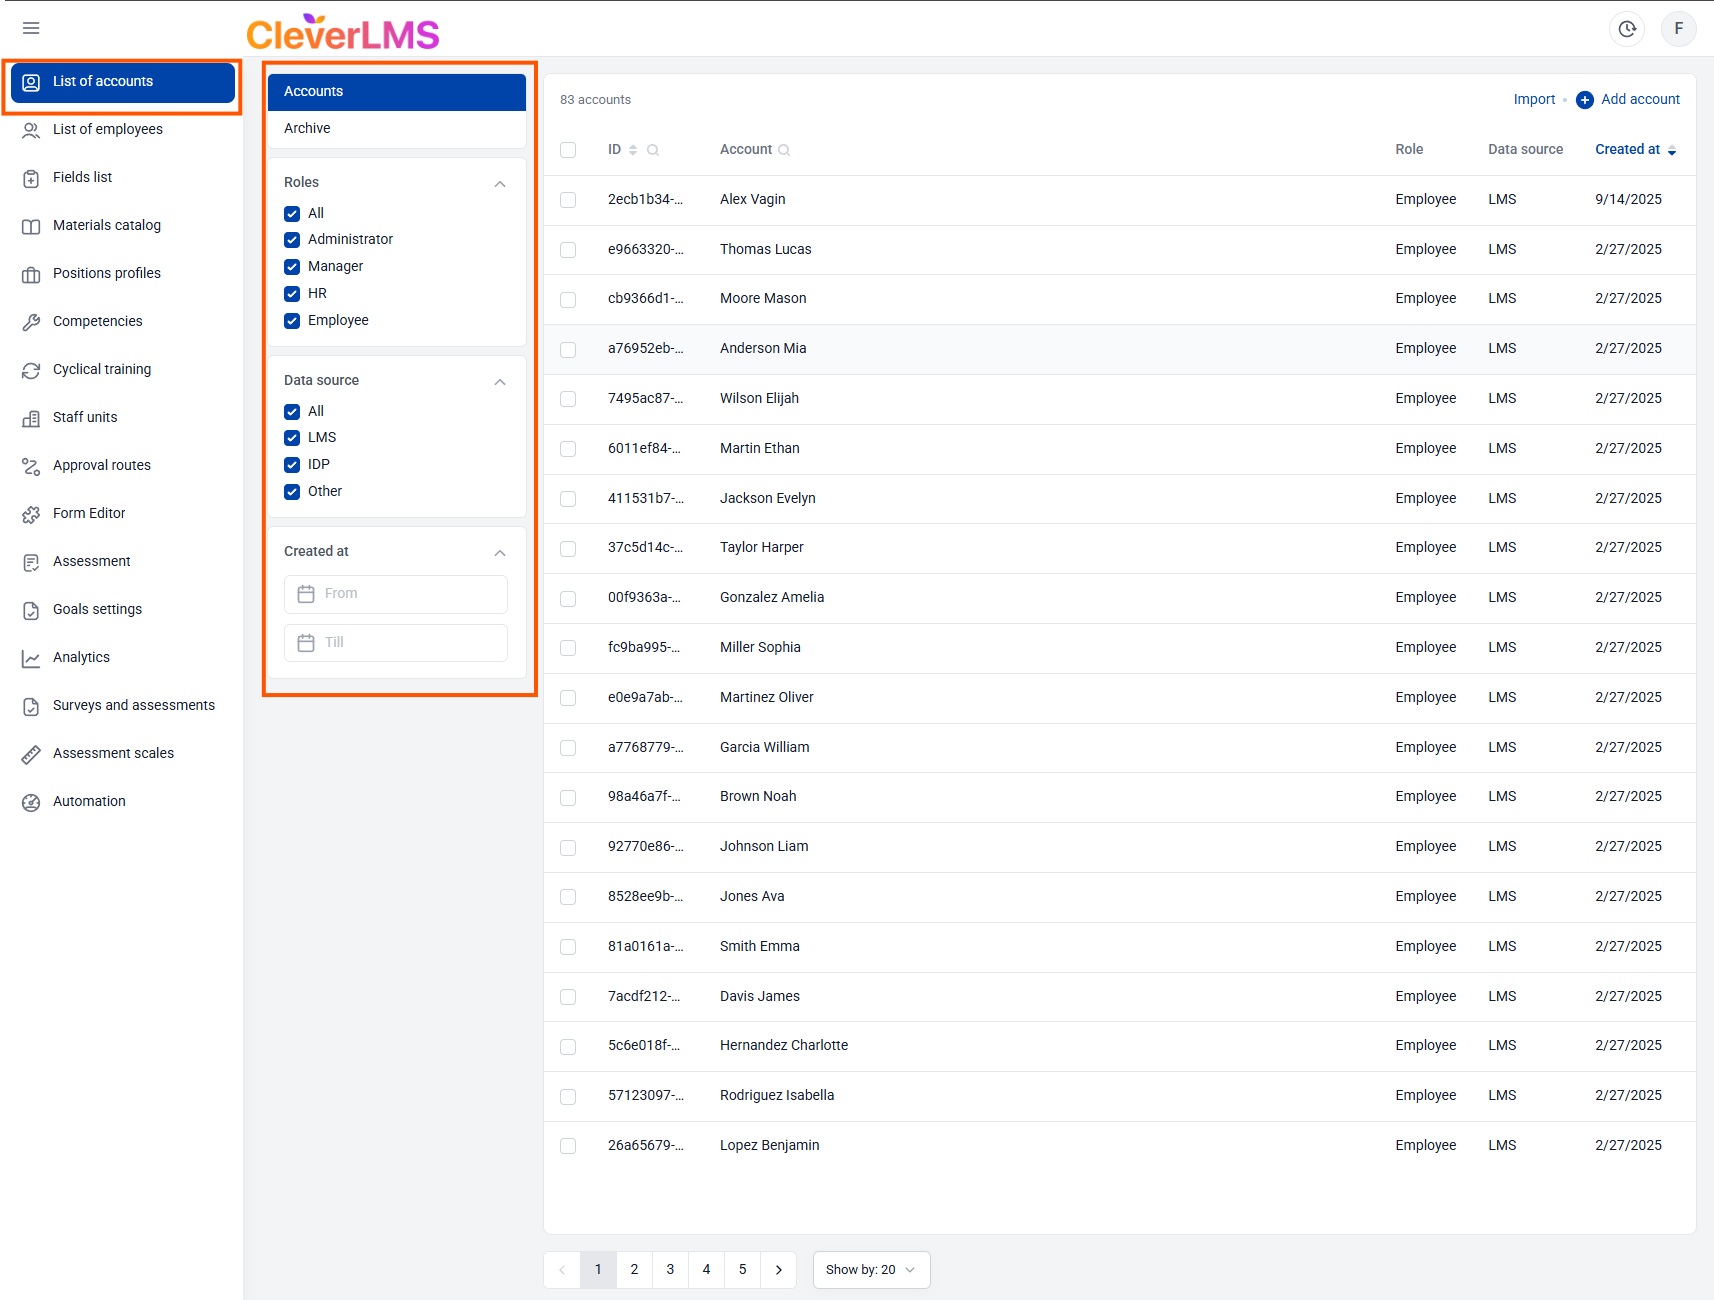
All active Accounts that have access to authorization in the system are located on the Accounts tab in the section, inactive ones - on the Archive tab .
How to archive and restore accounts
Accounts can be filtered by roles available in the system .
You can also display accounts in the list by Data Source to create an Account:
- All;
- LMS;
- YPRES;
- Other.
The filter added allows you to display only those accounts that were created within a certain period of time.
Clicking on an Account line in the list opens its card, where you can edit user data, as well as change the employee's visibility and access rights.
How to add accounts
The IDP module provides three ways to create Accounts: manually (one at a time), through Integration , and using an Import file .
Adding accounts for integration with an external system (with Equio)
The primary method for creating an account and employee. To enable the integration, please contact your support manager.
Data transfer is typically configured during the implementation phase, but can also be configured later. If data is transferred via integration, adding, editing, and deleting occurs in the source system (where the data is pulled from), while in the IDP, data is automatically updated via the API.
If the data in the third-party system has not been changed and is completely consistent with the data in the IDP module, the update is not recorded—the date of the last update in this case does not change.
It's important to note that only direct reports are included in the basic manager-subordinate structure transferred from Equio . Functional managers are not transferred automatically and can be further configured, if necessary, using the Employee Visibility Settings in the account permissions or through the Managers field in the Employee List section .
Adding accounts manually one by one
This method is suitable for creating individual accounts, such as administrators for technical tasks (without assigning them an IDP).
To add one Account in the IDP module:
- Go to the Accounts tab in the Accounts List section ;
- Click the Add Account button ;
- Fill in the values on the Account Details tab ;
- Fill in the values on the Rights tab ;
- Click Save .
Account Details tab :
Fields that are required are marked with * .
In the Employee field , you can select an Employee profile from those existing in the system and not linked to any accounts . If the employee doesn't exist yet, you can create one along with the account by selecting the Create new employee checkbox .
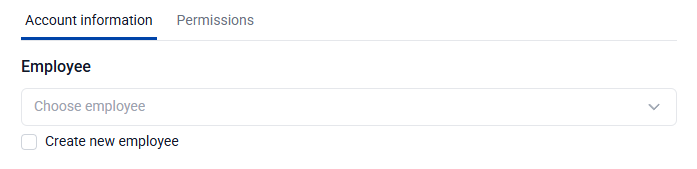
This field is not required, the Account can exist without an Employee.
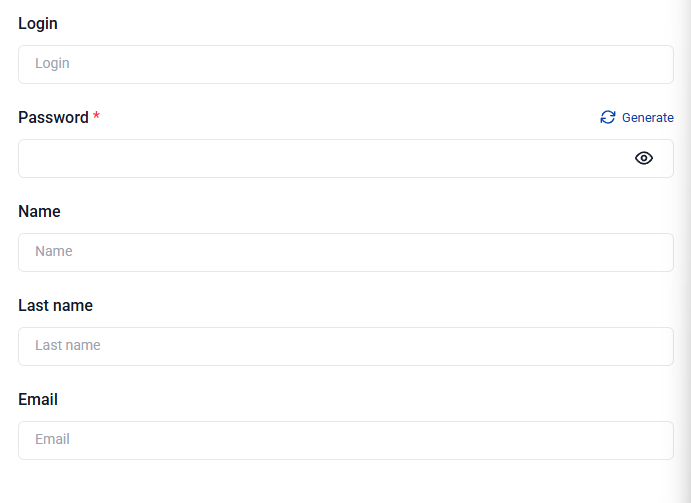
Fill in the fields Login, Password (can be generated), First Name, Last Name, Email.
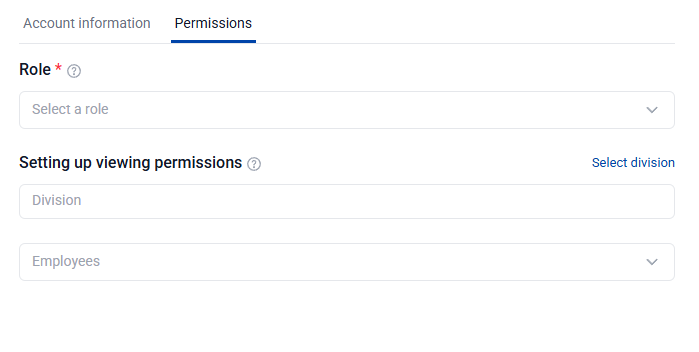
Rights tab :
Here you can configure the user's rights and access scope.
The Role field determines the level of access to the system.
The Employee Visibility Settings section allows you to further customize whose development plans the user will see in the My Team section. Customization is possible both at the department level and individually by selecting specific employees from the corresponding list.
Adding Accounts using the Import function
Account import in the system allows you to bulk create and update user accounts, and, if necessary, simultaneously create Employees and link them to the corresponding Accounts. This is a convenient way to quickly add large numbers of users or set up technical administrators.
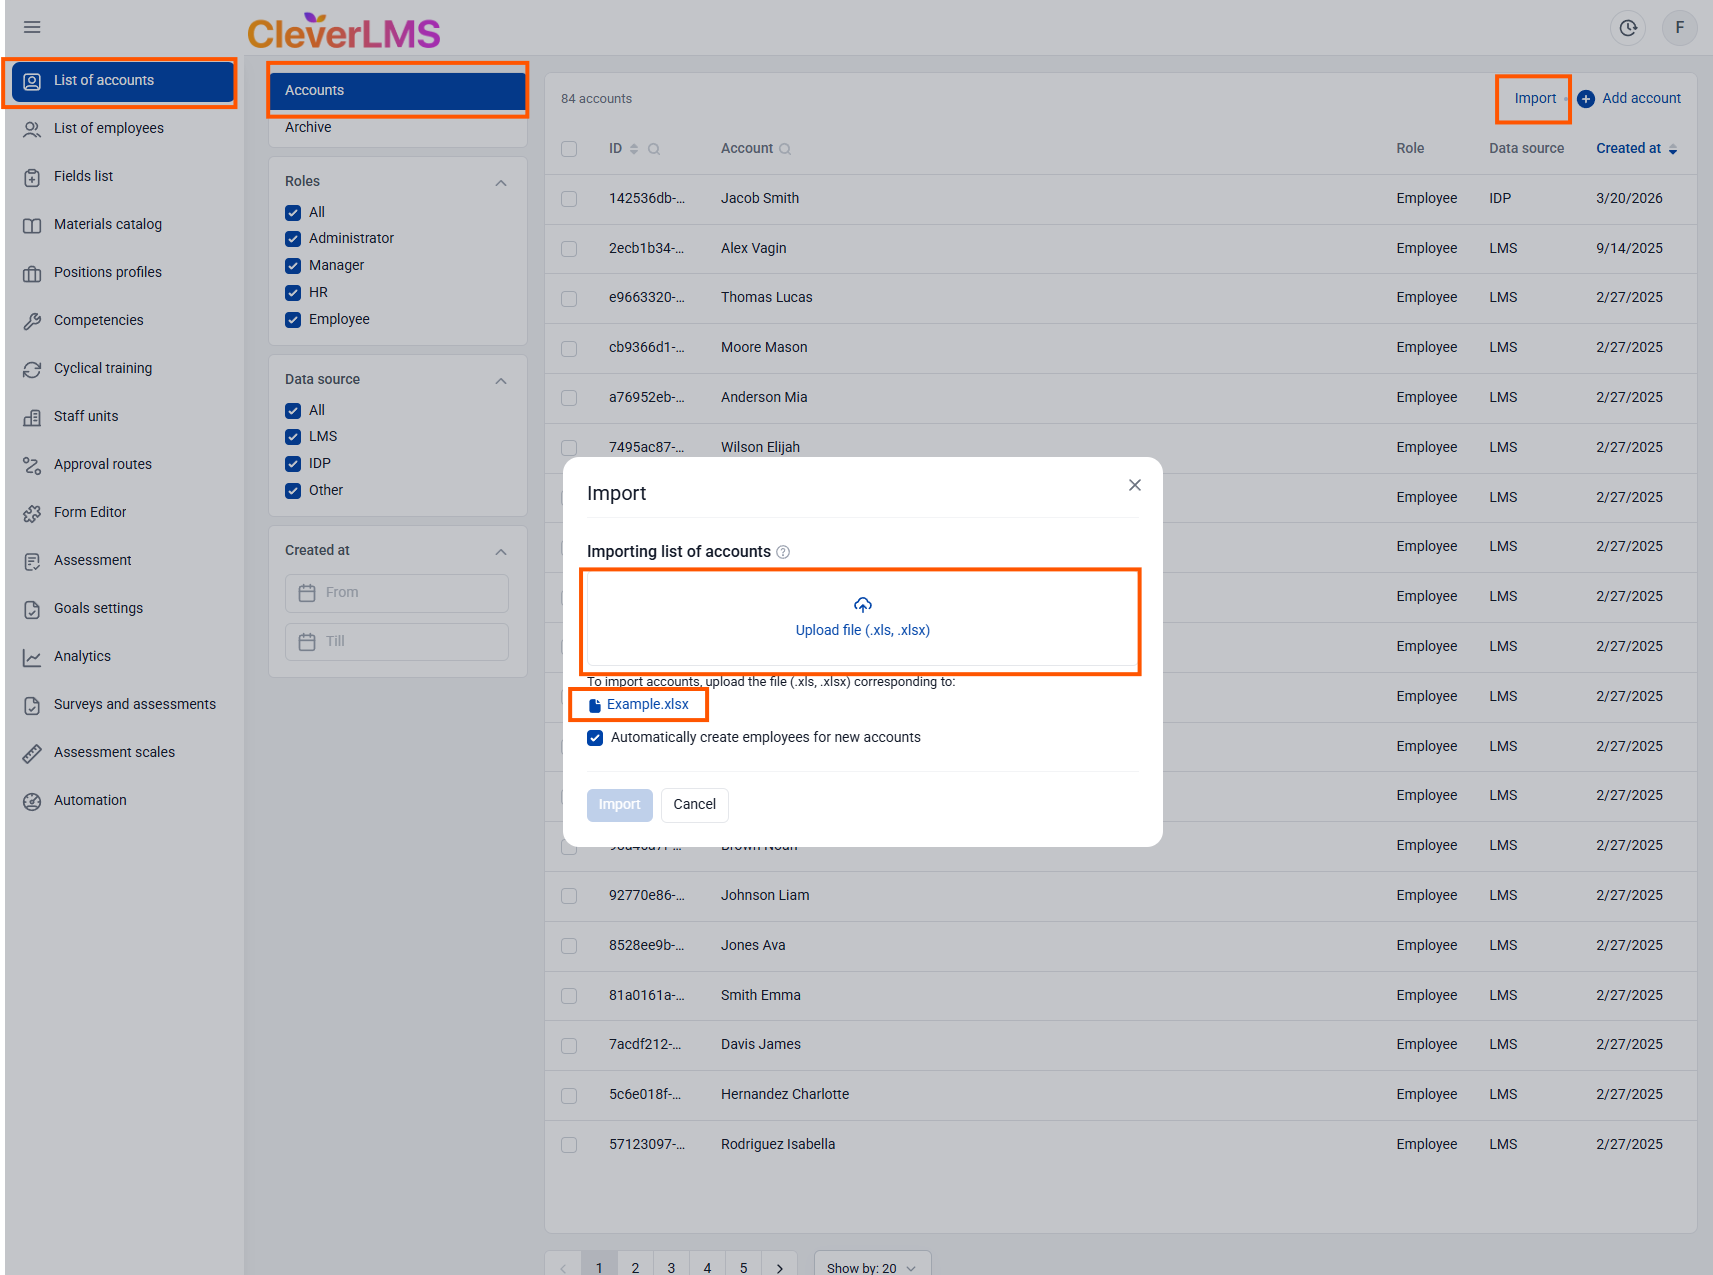
To add Accounts using the Import function:
- Go to the Accounts tab in the Accounts List section ;
- Click the Import button;
- Download and fill out the Import template;
- Upload the completed template into the system using the Upload file button ;
- Select the Automatically create employees for new accounts checkbox if you want to create linked Employees along with Accounts;
- Click Import .
The import template contains the following fields: Account ID , Login , Password , Last Name , First Name , Email , and Role . The file can be used not only to register but also to edit existing accounts.
- To create a new account , all fields are required except the account ID;
- To update an existing account, simply enter the account ID or email address . If neither of these identifiers is entered, the entry will be considered invalid and the account will not be added to the system.
The internal account ID , which is displayed in the List of Accounts section, is used as the ID .
The ID and password are optional columns, as the ID is used to update existing accounts, and the password can be changed during the authorization stage.
When updating an account, you must fill in either the account ID or login.
When importing accounts, the system first searches for an account by ID , if specified:
- If the account is found, the data is updated;
- If not found, the line is marked as invalid and the account is not added.
If ID is not specified , the search is performed by login:
- If the account is found, it is updated.
- If not found, a new account is created.
If columns other than ID or Login remain empty , the corresponding fields in the user card will be cleared . This allows for the proper deletion of outdated data, but requires careful preparation of the import file.
If a new account is created, an Employee associated with it can be created at the same time.
- In this case, only the required data is filled in the new Employee’s card: Email , First Name and Last Name , taken from the account;
- If an account already exists and an employee with the same email address is found, they can be linked to the account.
- If the Automatically create employees for new accounts checkbox is enabled , a new employee is created regardless of existing ones.
After import, the accounts will appear in the list of accounts.
Bulk actions in the Account List section
The administrator can perform bulk actions on selected accounts. To search for accounts in the table, use the filter in the additional navigation area or search by columns.
After selecting items by checking the box in the desired row, the number of selected items will be displayed above the table.
Archiving and restoring accounts
To transfer the IDP module user account to the Archive:
- In the Account List section, go to the Accounts tab ;
- Select the required accounts using the checkboxes , if necessary, using the search function by ID, full name;
- Click Actions and select Archive;
- Confirm the action .
To restore the IDP module user account from the Archive:
- In the Account List section, go to the Archive tab ;
- Select the required accounts using the checkboxes , if necessary, using the search function by ID, full name;
- Click Actions and select Restore;
- Confirm the action .
If an account is linked to an employee, their statuses change together:
- Archiving an account automatically archives the employee;
- Account recovery automatically reinstates the employee.